
History
The Moroccan Cement Tiles
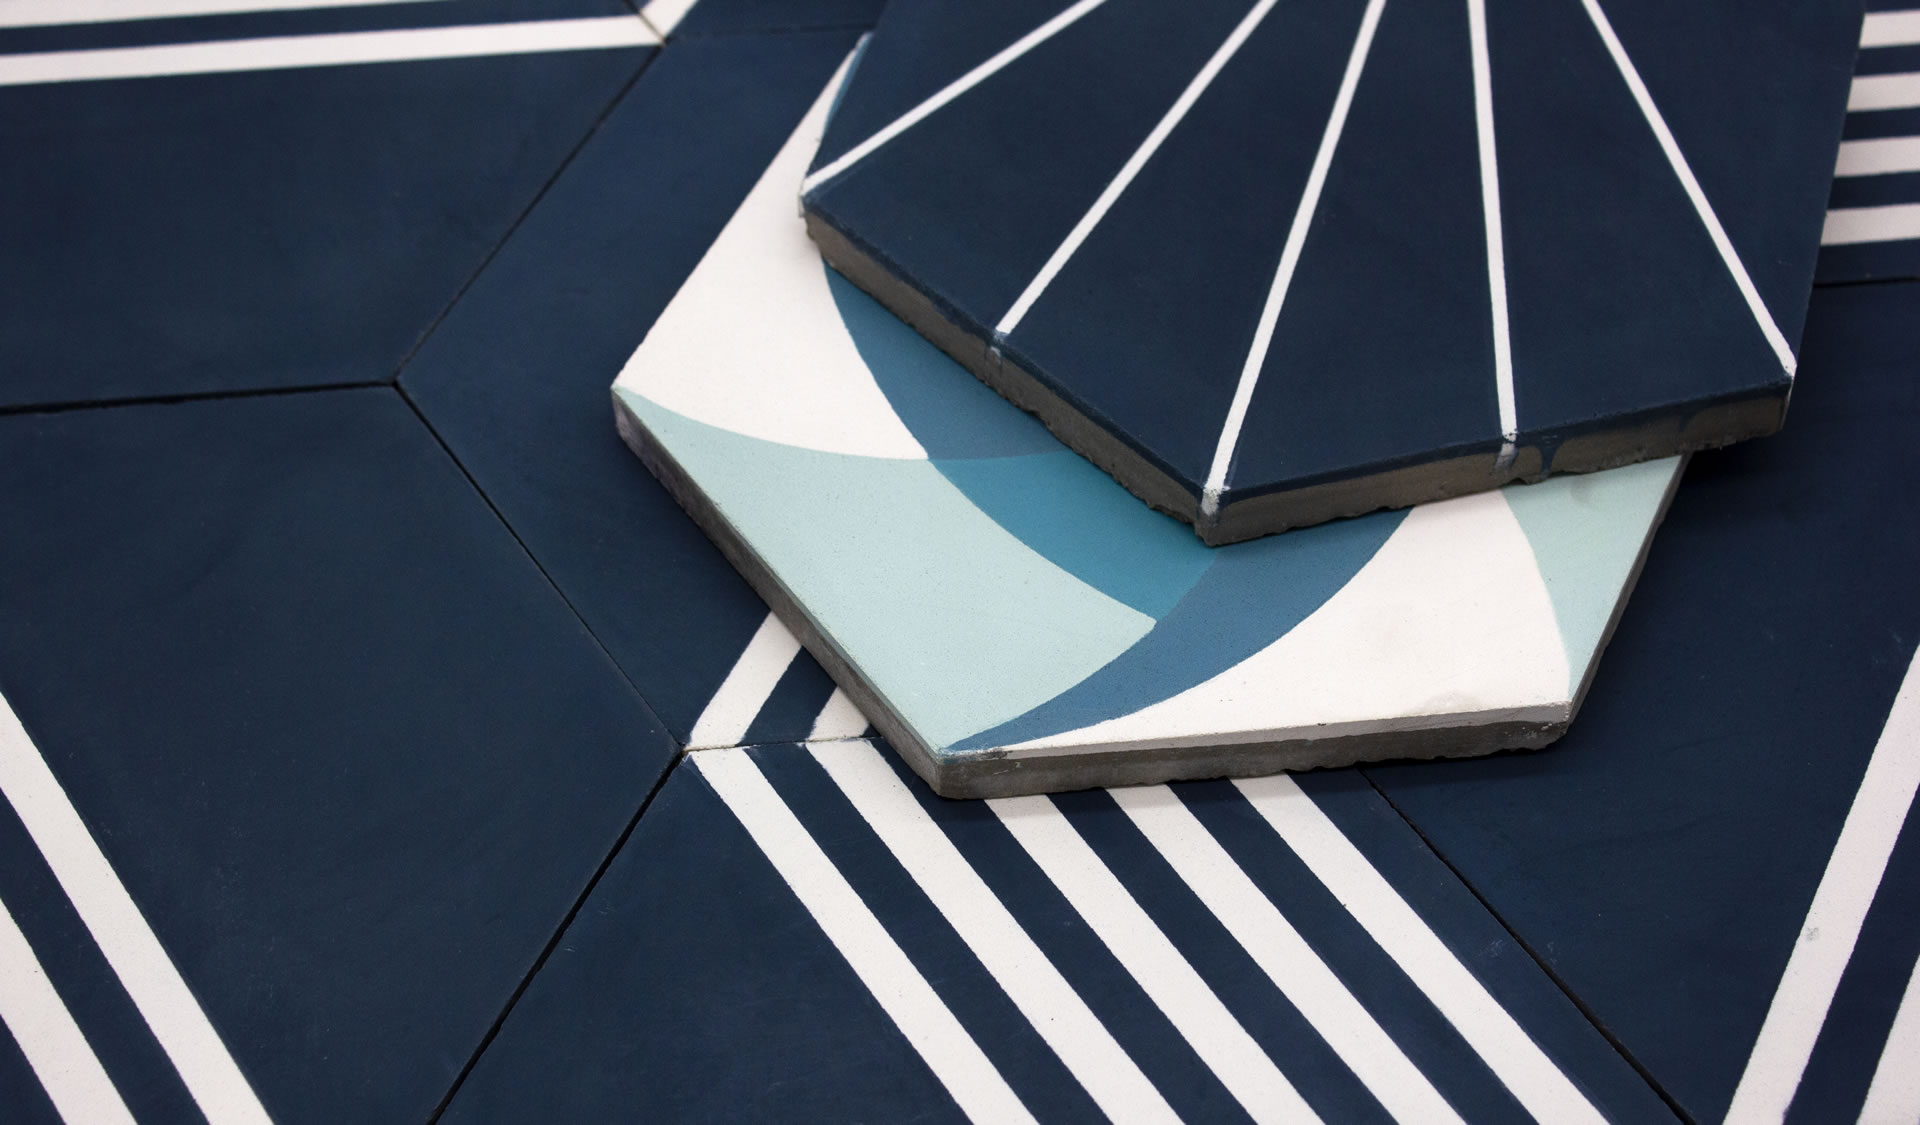
Encaustic cement tiles get their name from the term ``encaustic`` which is a old world technique for metal enameling. Because of similarities in their manufacture, cement tiles adopted the same name.The French and Catalans were the first to use the technique in the 1850’s both in France and in Barcelona. Complex patterns used in the tiles are due to an interest in ancient cultures, most notably early Moorish art. As a result, the tiles spread throughout Europe as a high quality flooring material and then onto former European colonies in Latin America, North Africa, and Vietnam.We make our modern cement tiles by hand, one at a time, using mineral pigments, cement, a mold, and a hydraulic press. Our cement tiles are unique and one of a kind, an as such, each tile will be subtly different from the next. A copper mold is used to make the individual patterns by applying separate pigments. The process is incredibly delicate, requiring skilled artisans with years of experience. Find installation and maintenance resources on our website.Cement tiles are not fired in a kiln because there is no glaze layer on the surface of the tile. As a result, their production has a much lower carbon footprint compared to ceramic tiles. Not only are they eco friendly, they are also incredibly durable, lasting well over a century. Each tile has an endless array of patterns and 100+ custom colors to choose from. Find the resources you need to find the right cement tile for you at ziatile.com

The Techniques
How It is Made
For zellige, the highest quality of clay must be used and is found in the Fez region of Morocco. Once found, in underground mines or open pits, this clay is soaked in water until it reaches a soft texture. The clay is then filtered by hand to extract impurities like rocks and branches. After filtering, a skilled craftsmen flattens the clay into square shapes by hand, ensuring it is compact and with no air bubbles in it. The square raw clay tiles are then sun-dried on a rooftop. After the tiles are well dried, another skilled craftsmen applies the glaze colors by hand, one-by-one, to only one side of the tiles. Once dried, the tiles are meticulously stacked in a natural olive-pit fired kiln. In these traditional Moroccan kilns heat circulates unevenly, imbuing each handmade tile with its own unique tone, texture, and color. This perfect imperfection is what sets Moroccan zellige apart from every other tile on Earth. Once fired, a skilled artisan will use a medieval tool called a ‘menkach’, a combination of an axe and hammer, to cut and shape each tile into the desired shape. This intricate process involves great patience and skill. The final result is Moroccan zellige tile with both tonal and size variation, along with small chips, pits and cracks that are to be cherished and celebrated.
Installation & Sealing
Cement tiles are made by hand, one at a time, using mineral pigments, cement, a mold, and a hydraulic press. The pigment composition is a mixture of high quality white Portland cement, marble powder, fine sand, and natural mineral color pigments.The individual patterns are made by manually applying separate pigments, one by one, in a handmade copper mold. It is an incredibly delicate and skilled process that can only be performed by highly trained artisans. Cement tiles are not fired; there is no glaze layer on the surface of the tile. They derive their durability from the combination of finely dehydrated cement and a more coarse sand/cement layer. The pigment layer is hydraulically pressed into the surface and becomes a part of the tile. The tiles are then soaked in a water bath for 24 hours and then set to dry for another seven days.
Proper installation and protection of cement tile is key. Please ensure that tile is laid by a licensed tile installer. Zia Tile is not responsible for any issues that arise due to improper installation or care. DO NOT LET THE BOXES GET WET! Moisture can seep into the tiles, which may result in staining or efflorescence in which a residual powdery limestone layer is deposited on the surface of the tile.
We do not recommend installing our tiles outdoors in places that experience frost/freeze in winter. Care must also be taken in areas that may get wet as the surface may cause a slip hazard. Cement tiles are unable to withstand the weight of vehicles and therefore should never be used in driveways.
Wall tiles can be affixed to plaster, drywall, cement block, and cement backer board. The installation surface should be flat and dry with any loose paint removed and cracked surfaces patched. New construction foundations should cure at least 30 days prior to installing any tile.
We recommend 511 Porous Plus by Miracle Sealants for all cement tile installations. This penetrating sealer protects the original matte finish of the tile. For commercial projects and high traffic areas, a matte finish topical sealer such as Fila Surface Solutions Matt Wax can be used for an additional layer of protection. For showers and wet areas with hard water exposure, we also recommend using Fila Matte Wax to help protect the tile from mineral deposits. This is especially important with darker cement tile colors that are continuously exposed to hard water and calcium deposits.
Always test a topical sealer on a sample or small area first to ensure that the desired finish is acceptable.
How To
Installation
Cement tiles are made by hand, one at a time, using mineral pigments, cement, a mold, and a hydraulic press. The pigment composition is a mixture of high quality white Portland cement, marble powder, fine sand, and natural mineral color pigments.The individual patterns are made by manually applying separate pigments, one by one, in a handmade copper mold. It is an incredibly delicate and skilled process that can only be performed by highly trained artisans. Cement tiles are not fired; there is no glaze layer on the surface of the tile. They derive their durability from the combination of finely dehydrated cement and a more coarse sand/cement layer. The pigment layer is hydraulically pressed into the surface and becomes a part of the tile. The tiles are then soaked in a water bath for 24 hours and then set to dry for another seven days.
REQUIRED MATERIAL:
For placing the tiles:
- – Sponge
- – Bucket
- – 1/16” tile spacers
- – High quality medium-bed thin set mortar
- – Trowel with ½” semi-circular notches
- – Un-sanded, neutral color grout – We recommend Mapei Flexcolor CQ
- – Grout float
- – Water-cooled tile saw with diamond edge blade
For cleaning and sealing cement tiles:
- – pH neutral cleaner such as Miracle Sealants Heavy Duty Cleaner (Acid Substitute)
- – Paint roller, paint tray, sponge and water bucket
- – Lint-free cotton cloth
- – 511 Porous Plus Sealer from Miracle Sealant – A gallon covers approximately 200-250 sq ft, a quart covers 150 sq ft
INSTALLATION:
- Before beginning installation, blend tile from all boxes in your shipment, lay out the tile in the installation area and ensure any variation is distributed evenly.
- If the subfloor is even and in good condition, a high quality medium-bed thinset is sufficient to set the tiles. Please make sure the subfloor has completely cured (usually a minimum of 30 days) to prevent efflorescence spots from depositing on the surface of the tiles as moisture evaporates through them. Uncured or unsettled sub-surfaces can cause cracks to form in the tile as the sub-surface deforms, so always ensure the sub-surface has cured properly before installing cement tile. Use of an uncoupling membrane (such as DITRA) may also be advised. For wall installations, only install cement tile on stable, even surfaces such as cement backer board. In dry areas (i.e. kitchen backsplash), cement tile may be installed directly to drywall. Never apply tile directly to a painted surface.
- Evenly apply the thin set mixture to the subfloor using a trowel. Wet the back of each tile with a sponge before applying the adhesive to the back of each tile, making sure to apply the mixture in the same direction in order to prevent air pockets from forming.
- Using only the palm of your hand, press the tiles into place. Do not use a rubber hammer or mallet as that can create small cracks that will grow over time. Ensure the tiles are perfectly flat during installation.
- Place in small sections no larger than 2’x2′ at a time, and immediately wipe off any residual thin set from the surface of the tiles. Thinset and grout can be incredibly difficult to remove without damaging the tiles if left too long.
- Use 1/16” tile spacers to separate the tiles.
- All saw cuts must be made with a water-cooled tile saw.
- After the tiles have been laid, allow the thin set at least 48 hours to cure before sealing and grouting.
- Cement Tiles must be sealed on-site. Use a pH neutral cleaner before sealing; products made to clean natural stone are usually suitable. Use of acidic cleaners will damage the tiles and should be avoided.
- After laying the tile and prior to grouting, apply penetrating sealer (511 Porous Plus) in thin layers until the tiles become fully saturated, wiping off any excess sealer before it dries. Do not over-seal as thick or excessive application of sealant can dry unevenly and result in an undesirable waxy film on the surface of the tiles. Allow sealer to cure, typically 1-2 days; always follow the sealant manufacturer’s application instructions.
- Using only standard, NEUTRAL, UNPIGMENTED, UN-SANDED GROUT, fill in the gaps between the tiles with a rubber grout float. Never spread dark grout over the surface of cement tile. Grout in small areas, no larger than 2’x2’, at a time. DO NOT grout the entire floor at once, as the tiles can stain from excess grout that is extremely difficult to remove later. Instead, grout small areas and immediately wipe away the excess grout as you go. Contrasting grout can stain or leave a grout haze and should be avoided unless hand grouting or using a grout bag.
- Before resealing, allow the grout to cure, usually 48 hours.
- Clean the tiles with pH neutral detergent, removing any residual mortar or debris. Never leave spills, drips, footprints, or any other marks on the tiles prior to sealing
- Completely clean and dry the tiles before applying a second coat of penetrating sealer over the tiles and grout. Commercial projects or clients wanting added protection may use Fila Solutions Matt Wax topical sealer 24 hours after penetrating sealer has fully cured on indoor applications only. DO NOT use Fila Solutions Matt Wax in outdoor applications as UV rays can cause discoloration over time.
- ALWAYS cover the tiles with durable paperboard i.e. Ram Board during and after installation to prevent damage and/or staining of the tiles until construction is complete.
ONGOING MAINTENANCE
Over time, cement tile wears like a natural stone product, which is part of the appeal of this old-world tile. Clients should expect natural wear, fine lines on the tile surface (also known as crazing) and patina to occur to the finish over time.
The guidelines above are for directional use only. Each customer is responsible for hiring a skilled installer that has both experience and expertise in installing cement tiles. MCMs not responsible for installing, ongoing care, or problems arising from any orders after receipt of product.